Monday, June 29, 2020

Add Magickal Protection To Your Coronavirus Mask!

Focus On The Physical Realm First


People often ask me "how can I protect myself magickally?" My first response is to protect yourself PHYSICALLY first. During the Coronavirus pandemic, wear a mask. Keep your social Distance. Keep yourself physically safe. Yet there are also many magickal things you can do to protect yourself from Covid-19. There are many different ways to approach spell work and a medical face mask presents a cool NEW opportunity to work protective magick!


Draw a protective symbol on the Underside of Your Mask!


You can draw a protection symbol on your medical mask

Nobody needs to know what sort of magick you are working to protect yourself if you put the symbol on the inside of your mask.

Create a Magickal Protection Box for Holding Your Covid-19 Protection Masks


Use an empty cigar box to hold your Covid-19 mask
The need to wear a protective face mask presented a new issue for me. I kept putting my new cloth masks in my sock drawer and every time I'd need to go somewhere I'd be wasting time hunting for it through the drawer. 
Finally, I decided to create a box that is unique for holding my masks, and I just happened to have an old cigar box that I had painted purple, once upon a time.

(I will now paint the inside of the box to make it more magickal.) 


Because the Covid-19 masks are for our protection, I drew one of the most common protective symbols on the lid of my facemask box. The five-pointed pentacle! For your box, you can use any protective symbol that you feel an affinity for. Focus your intention for protection as you paint your box.

You can also STORE YOUR MASKs with protective stones, and ask the stones to imbue warrior-protection to your mask.

I am a gardener so I store my masks with protective herbs like fresh rosemary or bay leaves. Doing that gives the mask a very pleasant aroma while I wear it (which is quite pleasant). If you store your mask with a dried herb, make sure the plant you select is nonpoisonous and that it won't irritate your skin.


Here are just a few protection symbols that you MIGHT use to draw on the back of your mask or on your mask storage box. 


  • Pentacle
  • Solar symbol
  • Mars symbol
  • Bind Runes
  • Eye of Horus
  • Triquetra
  • Helm of Awe


  • REMEMBER BEFORE DOING ANY MAGICK:

    FIRST: Take care of your emotional and physical self 

    When working any kind of spellcraft, it's important to be in a good frame of mind. 


    Rent a boat or take a walk in the woods (do something in nature)
    for your mental/emotional health
    • Do some other kind of exercise (bike, walk, dig a hole to plant a tree).
    • Eat healthy whole foods 
    • Take care of your emotional health by checking up with friends/family and doing things that feed your soul; socially.
    • EXAMPLES OF THINGS THAT MIGHT FEED YOUR SOUL:
      • start a garden
      • grow backyard chickens
      • adopt a dog
      • rent a boat
      • give yourself permission to read for pleasure!
      • take a walk in the woods
      • go for a swim
      • sunbathe (if that feels healthy for you)
      • fly a kite, ride a motorcycle, go horseback riding 
      • call your grandparents and be social with shut-ins
      • blog!


      • Every good witch knows that taking care of the physical and emotional realm is always the first order of attack for anyone who does root magick, stone magick, is a kitchen witch, or who does any other kind of spell work with symbols, Tarot cards, and/or stones.

        Many blessings to you. May you feel utterly safe and well.


    Saturday, June 20, 2020

    How To Turn a Printed T-shirt Into One-Of-A-Kind Home Art

    How to transform a T-Shirt into Kitchen Art!

    From this T-shirt


    Into This Kitchen Art


    Crone Crafts by the Mother of Invention


    I love thrift-store shopping. 


    My grandmother Dorothy loved second-hand stores too and she'd say to me "let's go ragging!" So as a young teen, I'd push her wheelchair to the local thrift store and we'd shop for treasures together. I have so many memories of shopping rag stores with her and I still treasure all of the fun expressions she'd make over the odd things we'd found.

    There's so much magick that happens inside of thrift stores - magick that's just waiting for your witchy transformation to turn those used goods into works of art! (Protect our planet from the people-virus. Repurpose and reuse!)

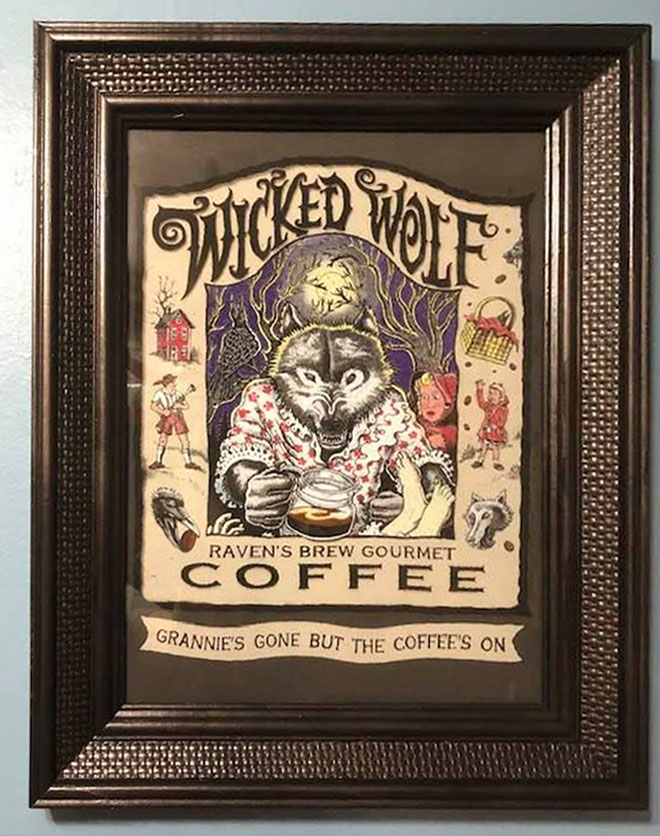
    Imagine my glee today when I found this wonderful X-tra large T-shirt for $7.99. It was way too big for me and definitely not the v-neck style of shirt that I'd be willing to wear. Yet I loved the logo so much, I thought I might transform it into a picture to hang in my kitchen!


    "Wicked Wolf Coffee! Grannies gone but the coffee's on!"


    To make this T-shirt become a work of home art, I needed the perfect sized picture frame for it and fortunately, I found one at the same store where I found the shirt!


    I paid $12.99 for this rather large used frame. It seems unimpressive at first glance. On the back of the frame, someone had written the names of these children (pictured) and they were designated as someone's grandchildren. Are you noticing the grandma vibe that's going on here in this entire post? 

    With three grandchildren of my own now - I'm really celebrating the whole grannie lifestyle! Bring on the crone!


    Isn't it lovely how transformative a couple layers of paint can be? In its original state, the natural wood frame wouldn't match my house. So I decided to paint it black. 

    I removed the old photo, washed the glass, and isolated the wood for painting. 

    You wouldn't even know this was the same wood frame! The painted version looks so much richer in all black!


    While the black paint was drying on the frame, I cut the T-shirt out into a rough rectangle to the size of the cardboard backing. 

    Then I added a very light amount of glue to the cardboard and
    glued the T-shirt's logo onto the cardboard. (NOTE: *Do not use too much glue when you do this or you might stain your shirt's fabric!*)


    Once both the glue and the paint were dry - I reassembled the frame with the T-shirt logo and fastened all the nails on back and finished it out with a hanging wire.


    Kitchen art from a T-shirt logo

    Now I have this awesome T-shirt logo in a large picture frame, hanging in my kitchen.

    The total price for this work of art was $21 
    and it is one-of-a-kind. I seriously doubt anyone else has anything that looks much like this in THEIR kitchen! (Don't joke about it. I love it.)

    That's what really matters. Isn't it? Your home should reflect the things that YOU collected and love. Happy thrift-store shopping! Or should I say, "Let's go ragging!"

    Thursday, June 18, 2020

    How To Make A Hanging Chicken Water Bowl

    Crone Crafts by the Mother of Invention


    I've got a new brood of chicks and that means I'm reassessing my chicken coop. Not only did I tear down the old Chicken house to build a new one, but I'm remembering all the water bowl cleaning I dealt with in times past as chickens scratch and claw the ground, kicking dirt into their water bowls.

    So this brood will get a HANGING water bowl (to hopefully keep the water cleaner).


    Found this rather large old cast iron Christmas ball at the Goodwill Pick-A-Part for $2. (Lights didn't work.)


    Removed the lights with a wire-cutter and that revealed the lovely cast iron frame.


    I hung the cast iron ball inside my chicken coop with wire I bought from the Dollar Tree. $3 into this project so far (and I have leftover wire)!

    Found a large metal bowl at a local thrift store for $2. Turning the metal bowl sideways, I was able to squeeze it in between the cast iron rungs. Total cost for my hanging chicken water bowl: $5.

    Monday, June 15, 2020

    Make A Sun Cross For Midsummer!


    Here in the Northern Hemisphere (e.g., Russia, Canada, and the USA) we will be celebrating Midsummer on Saturday, June 20, at 5:44 pmThose who live in the Southern Hemisphere (rapid hand wave to anyone from Africa, Antarctica, and Australia) is now entering their winter season; the poor vast herds.

    Midsummer for us Northerners represents the longest day of the year and is the official launch date of our Summer! *May loud cheering and celebration ensue!*


    Someone once said that the key to overcoming pain is to first embrace it. Then, let suffering fuel your creativity and passion! 

    As a Sun worshipper, my community and I've been enduring day-after-day of *ugh* dark gray skies with wet and dreary rain clouds. That drudgery comes amidst so much societal unrest (riots) and the Coronavirus pandemic. Um, can you say, "DARKNESS?" 

    Creating art to celebrate the Sun when LIGHT seems completely out-of-focus is a survival skill that I've employed for weeks now. Each day, crafting has helped me manifest a much BRIGHTER tomorrow. 


    How To Celebrate The Sun By Crafting!


    Ancient Sun Symbol = Modern Earth Sign

    For today's project, I created a Sun Cross wreath (see basic symbol, right. I mean the OTHER right. OK - so it's LEFT!). That's just how crazy the world is right now and we NEED Sun Energy!!!

    This symbol is is PERFECT for representing Midsummer because in ancient times it represented the Sun. Yet today, scientists use this very same symbol to represent Earth!

    As you craft, call the Sun forward, asking for a blessed reprieve from whatever ails you here on Earth... may the Sun bring light, warmth and healing upon you!


    The wreath frame


    You may cut a circle-wreath from cardboard if you
    do not have access to this Dollar Tree item.


    1. Start your project with a circular wreath or ring. 


    If you don't have access to a Dollar Tree or craft store, you may cut a circle out of cardboard and hollow out the center for your frame.


    I chose three materials to represent the Triple Goddess


    2. Glue on natural materials to set the base. 


    (I used wood shavings, dried  and dried mosses)


    You may or may not wish to add horns


    3. I made these horns out of aluminum foil. It's so easy to just wrinkle, mold, and create all kinds of shapes with aluminum foil so have fun just playing with this!

    I wrapped my newly formed silver tinfoil horns in masking tape and spray-painted them black. You may wish to skip this step (or not). Honor your own personal feelings!


    How to make the cross

    I bought a bamboo lantern at the Dollar Tree,
    cut it in half, and carved one bamboo twig to form a cross.

    4. Gather two sticks to form your cross.


    I bought a single bamboo lantern from the Dollar Tree (cheaper than bamboo at a nursery) and used a circular saw to cut the bamboo pole in half. Yet I noticed you could buy two toilet plunger handles for $1 each and they'd fit this wreath frame perfectly! Then, with two twigs, I carved a groove in one so the two sticks would fit together as shown.

    Glue the two twigs, sticks, or poles together. Then, once the glue is dry further secure the cross with either a screw or jute string (as I did). 

    I secured my cross with glue first, then tied it with Jute

    5. Now begin decorating your wreath by adding flowers, buttons, beads, babbles, feathers, nuts, and other findings that you want to incorporate into your art project. Decorate as per your whim!


    You might also wish to weave a witch's ladder and dangle it from the wreath. Use your Sun Cross' energy to empower any spellwork you've done before!


    I found a broken Sun pin so secured it to my cross' center as the focal point.
    You may also hang strings of beads, feathers, or a witches' ladder from your wreath! 

    Wednesday, June 10, 2020

    Crafts From Trash: Sun and Sunflower From An Empty Paper Towel Roll

    Crafts From Stuff You Have At Home - Celebrating The Sun (project 5 of 5)

    Crafts to make during the Coronavirus Stay-At-Home order


    *Check back June 15th for an elaborate Sun Wheel!*


    Who DOESN'T have an empty paper towel roll or empty rolls from toilet paper that they could turn into magickal creations for the home? When I began this effort to make 5-out-of-5 one-of-a-kind crafts, leading up to the BIG *Sun* project that I will be posting on June 15th ... I kept asking the Goddess for creative genius. I wanted this blog to be a BLESSING to someone. To bring some kind of glorious respite for the soul (despite all the ridiculous chaos that seems to be polluting our world and nation right now).

    Because many of us are avoiding shopping - I kept looking at everything that I was about to throw away or recycle and asked: "Can you be transformed into magick?"

    So HERE is my empty paper towel roll craft project!  


    To make either the Sun or Sunflower, from an empty paper towel roll, you will need:

    1. masking tape 
    2. glue (I mixed equal parts of flour and water to make mine)
    3. empty paper towel holder or else a couple of empty toilet paper rolls

    For the SunFLOWER (4 easy steps) you will ALSO need:

        • yellow crepe paper
        • an artificial flower for the center

    For the Sun (7 steps) you will ALSO need: 

        • wire
        • paper clips
        • the thick aluminum seal that you find when you open some large twist-top containers (e.g., a large plastic jar of coconut oil). *Save that thick foil! It's very cool.* You may also use normal aluminum foil; in a pinch.
        • Gold glitter fingernail polish or yellow paint
        • Round-tip needle-nose pliers


    The Sunflower frame is on the left. The Sun's frame is on the right.

    1. To begin either project, cut the 8 sections out of the empty paper towel roll. *IMPORTANT!* Measure each cut to exactly match the width of a piece of masking tape. (So the width of each cut from the roll is exactly the width of a roll of tape!)

    2. Place the eight circles together, in the shape of a flower (seven petals around a circle) and use the masking tape to secure each circular petal/sun ray tightly to the center circle as shown. 

    3.a. To make the SUNFLOWER: Begin wrapping the crepe paper around each section - using the glue to make it stick to the paper towel roll's circles.

    3.b. To make the SUN: I used gold glitter fingernail polish to paint the taped-together parts. I then creased the points of each "Petal" to make each one become a Sunray and TEMPORARILY added a paper clip to hold the Sun-ray's shape until the glue could set. 


    Fully wrapped Sunflower frame  |  paper-clipped/painted Sun frame


    4.a. Finish your SUNFLOWER by gluing an artificial flower in the center! (I happened to have a random Sun gem so embellished mine with it. You could either embellish with buttons or with small pieces of tin that you painted or add just about anything! Or you can leave this just as a Sunflower!)


    Refer to the second photo posted
    if you need a more direct perspective
    4.b. Take a piece of wire and run it through the center of your SUN's frame so the wire penetrates the center and comes out the other side. Repeat this process THREE TIMES so that all 3 wires criss-cross at the center; making 6 sun flares.


    5. Using the needle-nose pliers, begin twisting and shaping the wire (SUN flares).

    6. Gather the aluminum seal (or aluminum foil) and cut circles out of it to the exact diameter of the paper towel roll. (I used a same-size plastic bottle lid to trace mine).


    7. Begin stuffing each of the SUN's rays with wood shavings (as shown). I covered my shavings in glue to make them stay put. 


    HANG and enjoy your art!


    JUST MY NORMAL LIFE: That grey fox-like face in the mirror is a distortion, just like the plants are all distorted. I mean, I was standing in front of the mirror to take the picture and behind me is my kitchen doorway. I don't know where the salmon-pink color is coming from. It's not in my house. 


    Monday, June 8, 2020

    Crafts From Stuff You Have On Hand: Sun Mermaid

    Crafts From Stuff You Have At Home - Celebrating The Sun (project 4 of 5)


    Crafts to make during the Coronavirus Stay-At-Home order


    Everyone knows that Mermaids like to Sunbathe on oceanic rocks! You can make clay at home to create any Sun shape (or Mermaid) that you like in honor of Midsummer/Litha. Because we are approaching the Summer Equinox, I gave my clay-made Mermaid some golden Sun-like hair and a cool pair of shades to match the season.

    As with any magickal craft, it's important to visualize your desires while you work if you intend on using your artwork as a part of attracting what you long for and/or need in your life.


    RECIPE FOR AIR DRY CLAY: 

    Mixing equal parts of flour, corn starch, salt, and water.

    For 2 cups of clay ...

    • 1/2 cup of flour
    • 1/2 cup corn starch
    • 1/2 cup salt
    • 1/2 cup water
    Stir all the ingredients together and then knead the mixture with your hands. 

    NOTE: You can create your artwork and paint it later or else add food coloring to the wet clay for color. Let your project air dry for a few days before hanging or painting!


    ADDITIONAL ITEMS:

    For making my mermaid I used:
    • curly ribbon
    • a small piece of leftover wire
    • fingernail polish
    • glue (to connect the curly ribbon hair)

    Have a magickal time crafting!

    Friday, June 5, 2020

    Crafts From Trash: Sun Hanging Jar


    Crafts From Recyclables - Celebrating The Sun (project 3 of 5)


    Crafts to make during the Coronavirus Stay-At-Home order


    My many years as a Pagan have suggested that Witches and Pagans have a thing for glass jars. Perhaps you have an empty 7-day candle jar laying around. If not, you can make this craft with an empty pickle jar or another glass vessel.

    I have hung many glass jars in a window where I attempt to root plants from cuttings. It just seemed like the perfect time of year to add a little *Sun* to my window project.


    TO MAKE A WIRE SUN FOR A GLASS JAR OR VASE:

    Gather these supplies: 
    • Round-tip needle-nose pliers
    • Wire
    • Empty glass jar
    • Small bottle cap or Milk jug lid (to use as a guide)

    1. First, tie a circle of wire around the jar's upper lip and tie it off just under the rim (see green wire pictured). Once the circle is tight and secure you can add the handle that loops over the top of the jar.  Secure the loose end of wire to the opposite side of the jar by looping it through the rim-wire. Knot it and cut off the excess.

    2.  Now loop a new wire (e.g., gold wire) that will become your *Sun* through the band of the first wire.

    3. Begin bending the Sun's wire back and forth in somewhat even lengths as shown. Yet be sure to leave a straight length of wire dangling temporarily. That extra stretch of wire will become the center of the sun. 


    4. To perfectly gauge the Sun's center, grab a small lid. Begin carefully wrapping the Sun's rays (wire) around the lid, while attempting to keep each bend evenly spaced around the lid so they look like Sun rays.


    5. Once all the rays are stretched somewhat evenly around the lid you can tie the wire in a loop to secure the circle. Then begin bending the wire into a spiral and work that into the middle, as shown.


    May the healing rays of the Sun forever bless your home.